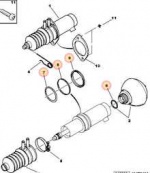
|  | Suspension sphere fitment procedure How we do it here | Please note! these notes apply to standard BX, Xantia & XM's Disclaimer Eurocarcare cannot and will not be held liable for ANY consequences of having followed these notes which are provided as a guide only for interested parties, Errors and omissions excepted. Before we commence, we ensure that we have the correct tools and facilities, and that we are confident in our abilities. Which of course we are having fitted millions of spheres over the years. !! The hydro-pneumatic suspension system works at VERY high pressure. Also the suspension can drop very suddenly if the vehicle is not supported correctly on axle stands or ramps !! We use:
A two post hydraulic vehicle lift. But, Axle stands or ramps and a Trolley jack work too.
Chain wrench or strap wrench
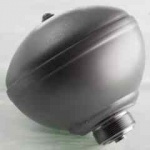
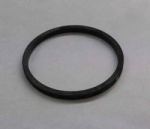
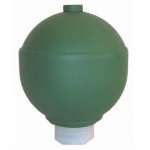
12mm open ended spanner It is imperative that we follow the procedure in the order as written to ensure that the system is de-pressurised at the correct time. 1A~ We start the engine and put the suspension in the HIGH position (lift up and move the height lever in the centre console to the rearmost position) 2A~ We jack up and support the rear suspension so that there is enough room to work under the car. We could support the car on the rear wheels using ramps, but we have to remember that the suspension will be in it's LOWEST position when the spheres are removed. 3A~ With the engine running and the suspension still in HIGH, we loosen both rear spheres approx. one full turn anticlockwise using the chain/strap wrench. This will break the seal between the sphere and the cylinder. The system pressure will hold the cylinder rigid to prevent it turning within it's housing. LHM fluid will leak out slightly from between the two componants. 4A~ Once both spheres are loosened, we leave the engine running and place the height control lever in it's LOWEST position (lift up the lever and move to the forwardmost position). This will allow the system to de-pressurise. Now is the time we go off and make a cuppa - around 5 minutes. 5A~ Once the system has de-pressurised and fallen to it's lowest position, we switch off the engine and fully remove the spheres. here we must BEWARE! residual pressure may squirt LHM fluid from the sphere once removed. (eye protection is strongly recommended). Also, we ensure that the car cannot drop and injure us if it has not reached it's lowest position. 6A~ We remove the old 'o'ring seals from the suspension cylinders and carefully fit new ones. (supplied with spheres). Lubricate the surface of the new seals and carefully fit the new spheres ensuring the seals are not disturbed. Tighten the spheres using the chain/strap wrench, bearing in mind that they only need to be just more than 'hand' tight. Being careful not to twist the suspension cylinders in thier housings. The rear is now complete. Following on from fitting the rear spheres we can now commence fitting the front. 1B~ We do not alter the position of the car at all. Ensure the front suspension is still in it's LOWEST position and simply unscrew the front spheres. 2B~ We remove the 'o'ring seals and replace them (as described for the rear spheres). Carefully screw in the new spheres, and as with the rear's tighten then just more than 'hand' tight. The front is now complete Fitting the accumulator sphere 1C~ The accumulator sphere is fitted to the pressure regulator, which is mounted on the front of the gearbox bell-housing. 2C~ The accumulator sphere MUST be de-pressurised before removal. To do this, we locate the BLEED SCREW on the pressure regulator and unscrew it half a turn. (The bleed screw is the TOP screw facing forward, and is the only 12mm head) 3C~ Once the bleed screw is loosened, the accumulator sphere can be removed. Due to lack of space around the sphere, a chain/strap wrench will not always fit, so it is acceptable to loosen the sphere using a chisel or similar, tapping it around anti-clockwise. we fully unscrew the sphere and replace the unit as per previously described for the other spheres. 4C~ The spheres are now all fitted and all that remains is to check for leaks, and check the LHM fluid level. We start the engine and put the suspension in HIGH position. Once the suspension has risen, we visually inspect all the new sphere joints for leaks. 5C~ We remove the supports for the rear suspension. 6C~ We return the height adjustment lever to the NORMAL position in the middle 7C~ We check the LHM fluid level (the yellow disc should be BETWEEN the two red lines on the reservoir guage). JOB DONE! If we are fitting just front spheres. 1D~ We start the engine and place the height control lever in it's LOWEST position (lift up the lever and move to the forwardmost position) 2D~ Go make a cuppa (around 5 minutes) 3D~ Once the system is de-pressurised and the car is at it's lowest position, using the chain/strap wrench we loosen the front spheres. Here we must beware, some residual pressure may remain causing a little LHM fluid to squirt out. It's not unheard of to see a 'green' mechanic wandering across to the washrooms (stop sniggering at the back) 4D~ We completely remove the old spheres and the old 'o'rings. Fit the new 'o'rings and lubricate lightly with LHM. 5D~ We crew in the new spheres and using the chain/strap wrench tighten to just more than 'hand' tight. 6D~ We place the height control lever to HIGH and start the engine. Check for leaks. Check LHM reservoir level. 7D~ We return the height adjustment lever to the NORMAL position in the middle Front spheres are now complete. If we are fitting just the rear spheres, we would follow notes: 1A to 6A and move on to 4C to 7C |